


In today’s data-driven world, organizing and analyzing information efficiently is paramount. Excel, a robust tool for data management, often becomes cluttered with duplicate entries, hampering accuracy and productivity.
But fear not; as we delve into the art of deleting duplicates in an online Excel sheet, you’ll learn effective techniques to streamline your data like a pro. From identifying duplicate values to utilizing built-in features and employing advanced methods, this comprehensive guide will equip you with the skills to declutter your spreadsheets and enhance your data management prowess.
Understanding Duplicates in Excel
In Excel, a duplicate is the data that appears more than once within a specific dataset. This could be duplicate rows with similar values in several columns or duplicate values in single columns.
But thanks to Excel’s robust features, you can readily identify these duplicate values, rows, or columns and delete them accordingly.
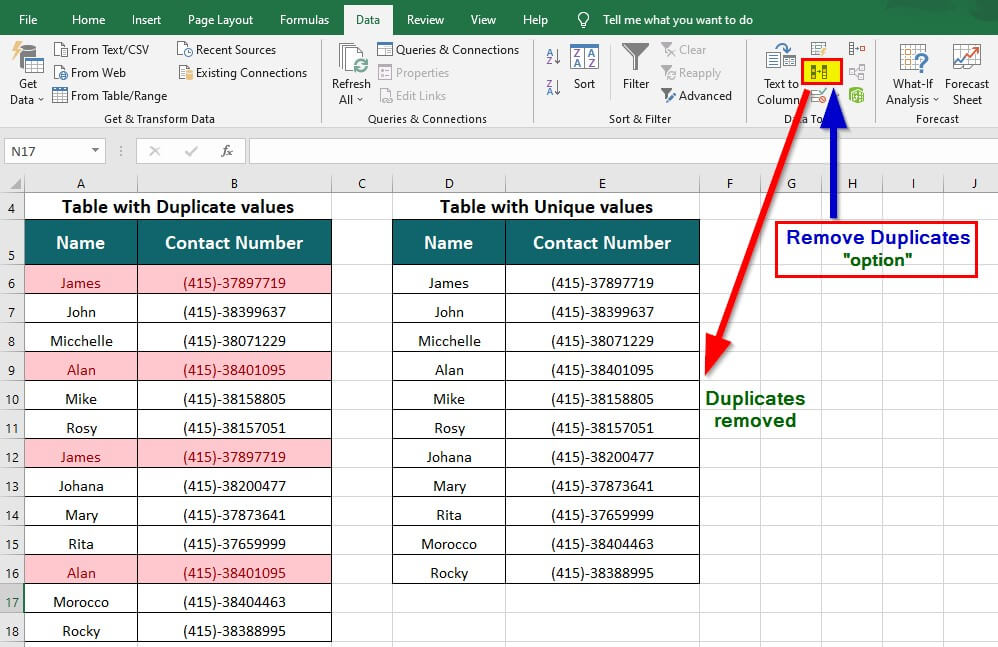
Identifying Duplicates in Excel
Excel comes loaded with several powerful, built-in tools capable of identifying duplicates within a dataset. The most popular tools for this task include the “Remove Duplicate” and the “Conditional Formatting” tools.
Let’s check out the different steps to delete duplicates in Excel
The “Remove Duplicates” Method
To delete duplicates in Excel using this method, follow the steps below:
Step 1: Select the data range you want to delete duplicates from.
Step 2: Navigate to the Data tab in the Ribbon.
Step 3: Click on the “Remove Duplicates” button within the Data Tools group. A dialog box pops up.
Step 4: If your data range has headers, ensure to check “My data has headers.”
Step 5: In the Columns section, check or select the field(s) containing the duplicates you want to delete. You may select one or more fields (columns) or All.
Step 6: Click “OK” to delete duplicates and retain the original data.
The “Advanced Filtering” Method
Follow these steps to delete duplicates in Excel using the Advanced Filter feature:
A. Create a duplicate-free list by launching the Excel worksheet containing the data.
B. Make sure the data range has a header row with column names
C. Select the whole data range, including the header row.
The next thing to do is to define the criteria for filtering duplicates:
Step 1: Navigate the “Data” tab in the Excel ribbon.
Step 2: Click on the “Advanced” button within the “Sort & Filter” group. The “Advanced Filter” dialog box pops up.
Step 3: In the “Action” area, select the “Copt to another location” option.
Step 4: In the “List range” field, the data range should be populated before then.
Step 5: In the “Copy to” section, assign the destination range where you want the unique data to be copied. Ensure this range has a blank column for the copied data.
Step 6: Check the “Unique records only” box. Make sure the “Criteria range” section is empty.
Filtering and copying unique data to the new location
A. Click on the OK button within the “Advanced Filter” dialog box.
B. The entire duplicates will be filtered out, while only the unique records will be copied to the assigned destination range.
You will now be left with a new list of data sans any duplicates. Ensure the destination range has sufficient space to accommodate the unique records. The destination range should not be included in the original data range.
Dealing with Partial Duplicates
Partial duplicates can be a headache in many cases and cause confusion if not dealt with decisively. However, you can deal with partial duplication using a combination of techniques.
Step 1: Select the range of data in Excel in which you suspect partial duplicates exist.
Step 2: Navigate to the “Data” tab in the Excel ribbon and then click on the “Remove Duplicates” button. A “Remove Duplicates” dialog box appears.
Step 3: Select the columns containing the data you want to check for partial duplicates.
Step 4: Click the OK button, and Excel with swiftly pinpoint and delete exact duplicates of data from your selected range.
Remember that the “Remove Duplicates” built-in feature in Excel is essentially designed to identify and delete exact duplicates.
You should review the results after deleting partial duplicates to ensure the data meets your requirements and is accurate. In addition, ensure there is a backup of your original data before carrying out any modifications.
Conclusion
Removing duplicates in Excel is an important task that helps maintain data accuracy and enhances efficiency. With just a few clicks, you can identify duplicates swiftly and use Excel’s built-in features, such as “Remove Duplicates,” filtering, etc., to streamline your data and remove all duplicates effectively.
Follow the steps outlined in this article, and you will end up with reliable and clean data that enhances decision-making and effective analysis.


